Easy to Make American Girl Horse Stable
Difficulty
Beginner
| 
How to build a horse stable for American Girl or 18" dolls.

Please don't be mad at me for getting you this plan just days before Christmas.
I promise you, that was not my intention.
Horses for American Girls were on a couple of special little girl's Christmas lists, and Auntie Ana just couldn't afford to buy stables too.
So I thought, I'll just put together a really quick little barn so at least they have something to play horses with.
I promise you, I had no intentions of it turning out this cute.
I promise.

It was a happy accident. Please don't be mad at me for sharing this plan so close to Christmas morning!
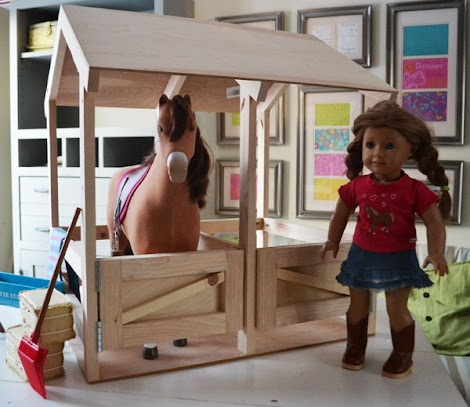
The horse stables fits two horses, but you could make it longer or shorter to fit the needs of your children - one stable for small spaces, three or four for more horses.

Then ends are open so little hands can reach in and play with the horses and clean stables.
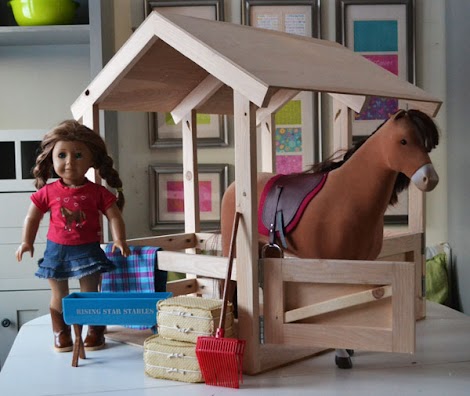
There's real working stable doors too.
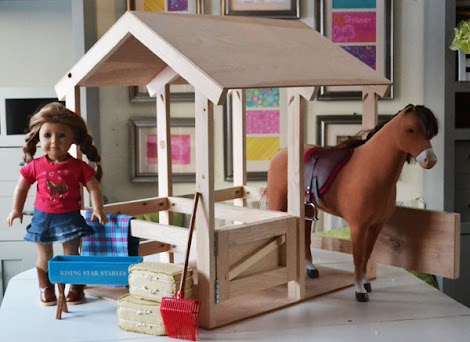
On both sides.

I don't know what got into me, but I just had to make some little hay bales to match as well.

What is a barn without hay? If you want this tutorial, let me know - these little play hay bales so darling!

If it helps, this stable took me about one and a half hours to construct (but I have my tools set up and shop space) and I used just a quarter sheet of 1/4" plywood (that's about $5 in plywood) and 4 1x2 furring strips to bring the grand total to less than $10 for this horse stable wood. The hinges were $2 and then you'll need some screws, but definitely, all said and done, you are getting off cheap by DIYing this Horse stable!
Well, if you are trying to get it under the tree, you better get building so I won't keep you any longer! Enjoy the plans!
Dimensions
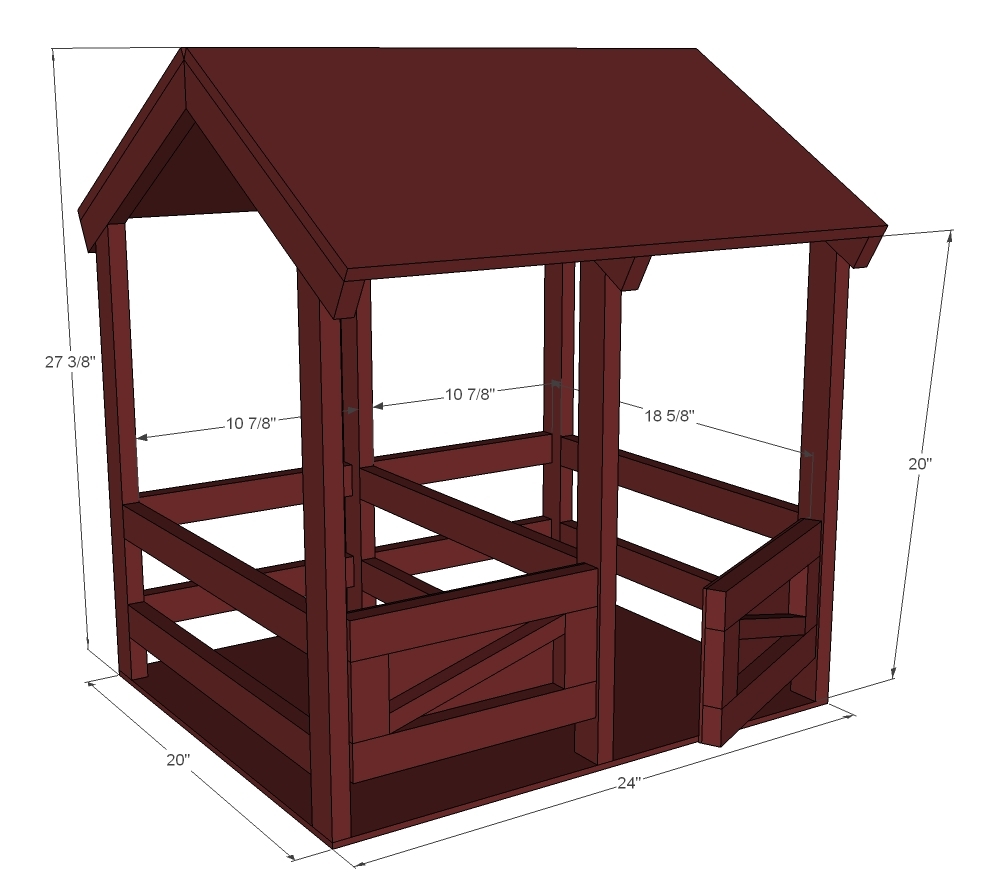
Dimensions shown above. It's big.
Preparation
Shopping List
4 - 1x2 @ 8 feet long
24" x 48" (Quarter sheet) of 1/4" plywood or hardboard (I used Purbond)
21 - 1 1/4" pocket hole screws
6 - flat headed wood screws (1" - 2" in length for attaching the base to the legs)
wood glue
12 - 1 1/4" finish nails (for attaching the roof - you can use screws)
Cut List
6 - 1x2 @ 17"
6 - 1x2 @ 19" (SHORT point measurement, top end is cut at 30 degrees off square)
6 - 1x2 @ 13 1/2" (LONG point measurement, top end is cut at 30 degrees off square)
4 - 1x2 @ 10 7/8"
2 - 1/4" plywood @ 13 1/2" x 24"
1 - 1/4" plywood @ 20" x 24"
DOORS
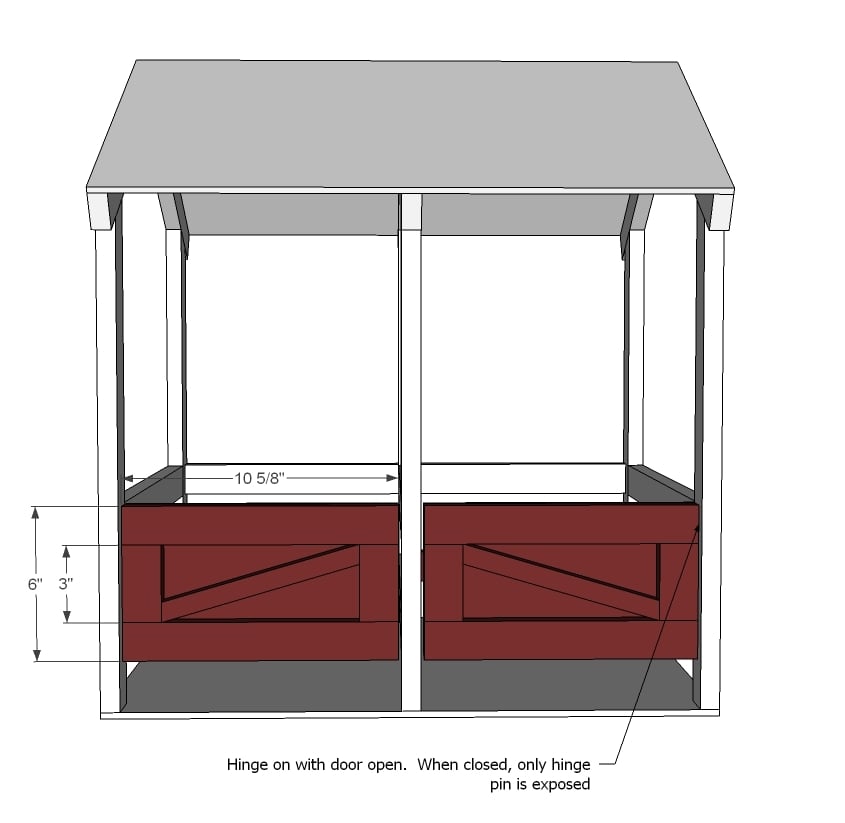
4 - 1x2 @ 10 5/8"
4 - 1x2 @ 3"
2 - 1/4" plywood scraps 10 5/8" x 6" (optional)
2 - 1x1 cut to fit - end angles are approximately 15 degrees off square

General Instructions
Please read through the entire plan and all comments before beginning this project. It is also advisable to review the Getting Started Section. Take all necessary precautions to build safely and smartly. Work on a clean level surface, free of imperfections or debris. Always use straight boards. Check for square after each step. Always predrill holes before attaching with screws. Use glue with finish nails for a stronger hold. Wipe excess glue off bare wood for stained projects, as dried glue will not take stain. Be safe, have fun, and ask for help if you need it. Good luck!
Instructions
Step 1
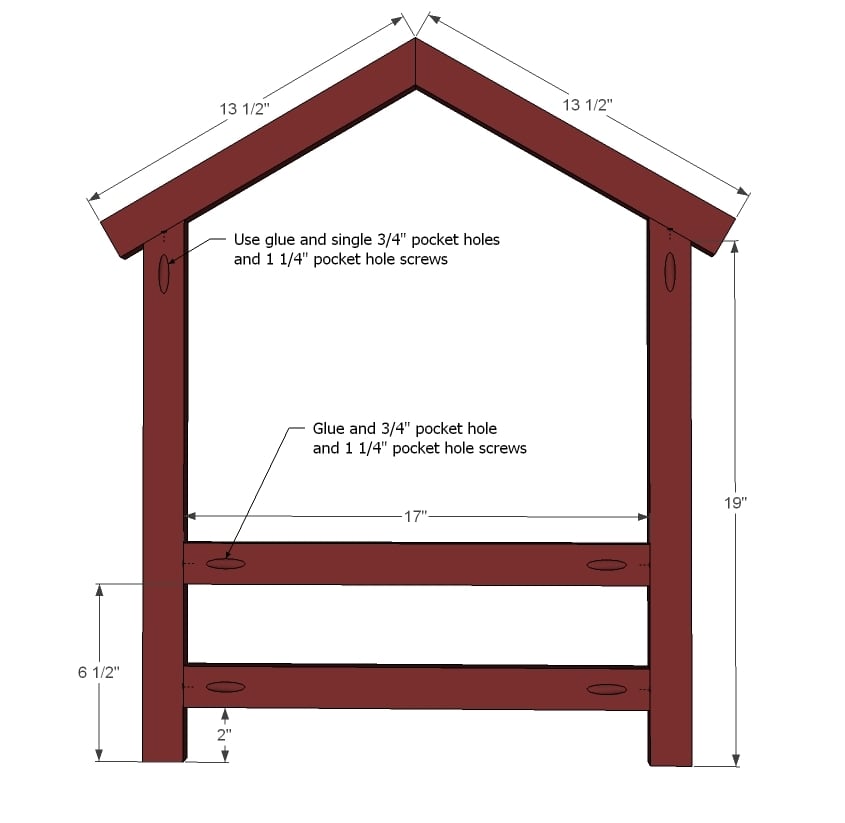
Start by building three trusses out of the lx2s. Clamp all joints and attach with glue. What I did was first put together all three roof trusses by attaching at the top with a 3/4" pocket hole and 1 1/4" pocket hole screw. I laid these flat to dry and then built the walls. Then I centered the trusses on the walls and attached. Overhangs were about 1 1/4" for me.
I built one on top of the other to make sure they all matched up.
TIP: If you find your wood is splitting, try setting your pocket hole jig to the 1/2" setting and using 1" pocket hole screws.
Step 2
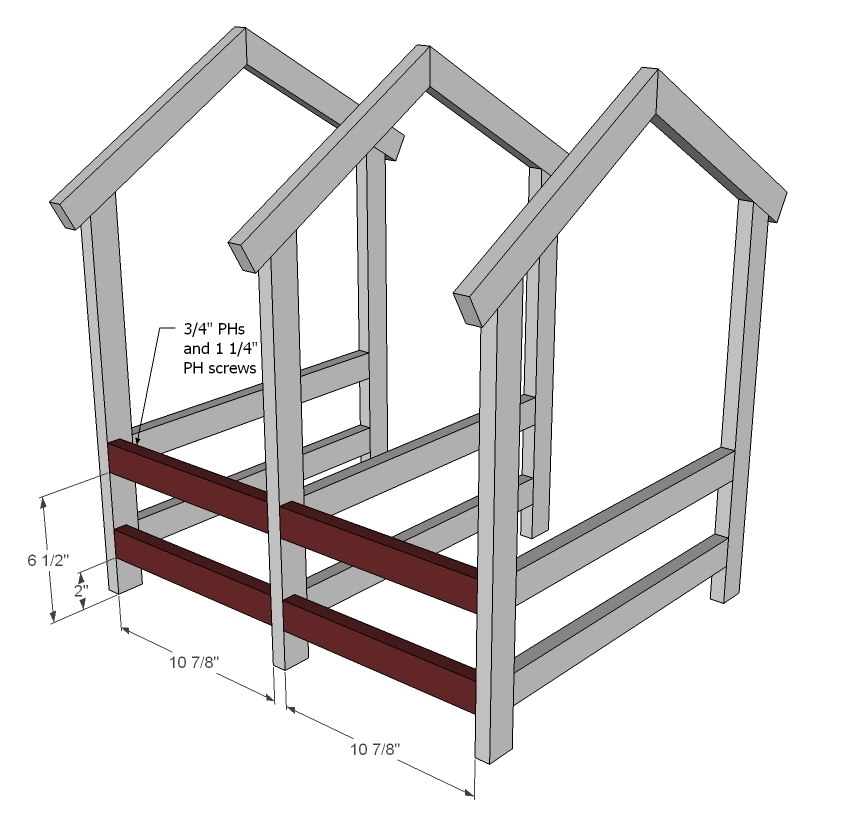
This should be the easy part but it was actually the hardest part! The reason is my drill was too big to fit inside and attach the pocket hole screws. I ended up using a screwdriver and hand attaching. If you are painting, an easy solution is to simply place the pocket holes to the outsides so you can fill and paint them. Another option is to just drill the pocket holes on one side, and then attach all four back pieces to the center truss. Then attach the outside trusses with countersunk wood screws from the outsides to the back.
Remember to rotate your trusses so that the pocket holes are hidden to the insides unless you are painting - then you might want to keep them on the outside to fill, sand and finish them easier.
Step 3
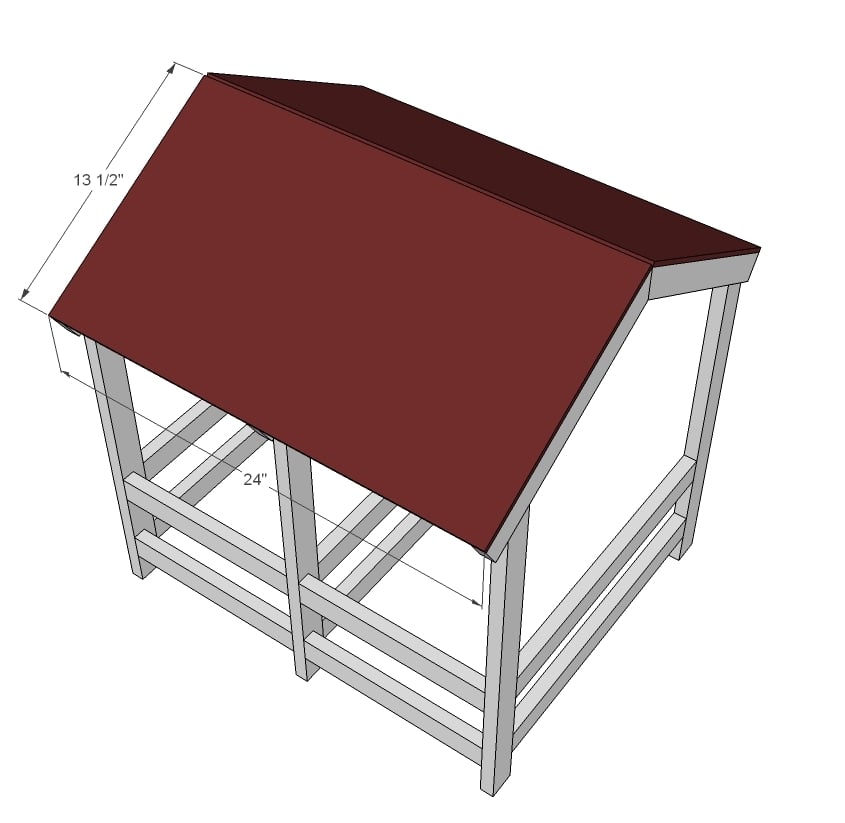
Once this step was done, it was all cake. Or frosting I should say! I applied glue and nailed the roof pieces on. I used the roof pieces to square up the horse stables.
Step 4
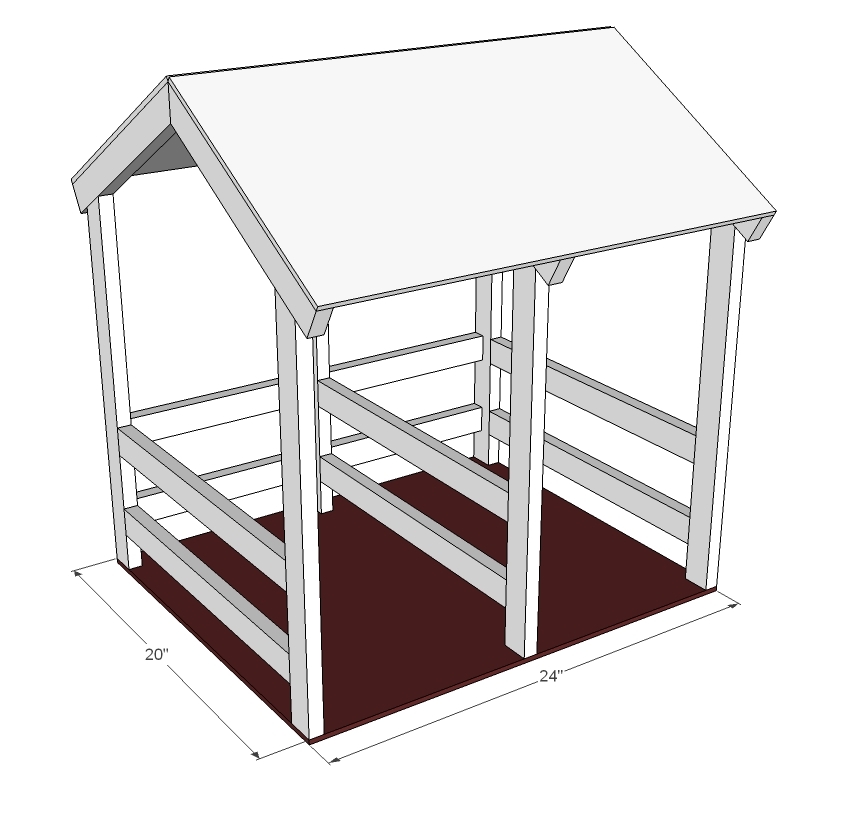
Now I really considered no bottom, but the project needs it for structure. If you didn't want a bottom, you should at least place 2 - 1x2s 24" long hitting each of the truss legs on front and back. I screwed the plywood on with 2" wood screws and wood glue, using a countersink bit to keep my wood from splitting. This really squared things up and made the horse stable sturdy.
Step 5
Preparation Instructions
Fill all holes with wood filler and let dry. Apply additional coats of wood filler as needed. When wood filler is completely dry, sand the project in the direction of the wood grain with 120 grit sandpaper. Vacuum sanded project to remove sanding residue. Remove all sanding residue on work surfaces as well. Wipe project clean with damp cloth.
It is always recommended to apply a test coat on a hidden area or scrap piece to ensure color evenness and adhesion. Use primer or wood conditioner as needed.
Source: https://ana-white.com/woodworking-projects/horse-stables-american-girl-or-18-dolls
0 Response to "Easy to Make American Girl Horse Stable"
Post a Comment